Purchase Posting
Purchase Posting
Purchase posting refers to the process of recording and posting purchase transactions in an accounting system. It involves documenting the details of purchases, such as the date, supplier information, items purchased, quantities, prices, and any applicable taxes or discounts. The purchase posting process is crucial for accurately tracking expenses, updating inventory levels, and managing accounts payable.
To add purchase posting, Go to Account >> Transaction >> Purchase Posting
Just after a click on purchase posting, you will see the following screen.
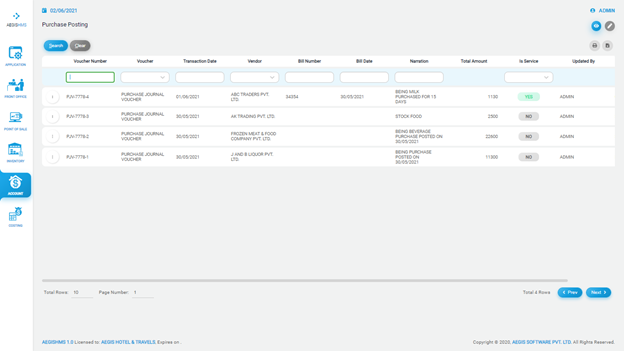
On the top right side, you can see two icons. Each icon has a different function in the system. If you click on the ‘Eye’ icon, it will show you the list of purchase postings. Press Alt + 1 to open an ‘Eye’ icon directly.
You can also filter the list in different ways such as ‘Voucher number’, ‘Voucher type’, ‘Transaction Date’, ‘Vendor’, ‘Bill Number’, ‘Bill Date’ and ‘Narration’.
After that, you will see the list of purchase posting as given below:
To list the purchase posting, you can click on ‘Pencil’ or press Alt +2. After that, you will see the following screen.
You can see the list of purchase posting in two different ways. At first, you can click on the ‘Regular’ tab and fill in the required information to see the purchase list. In this section, you will only see the purchased item listed in Inventory.
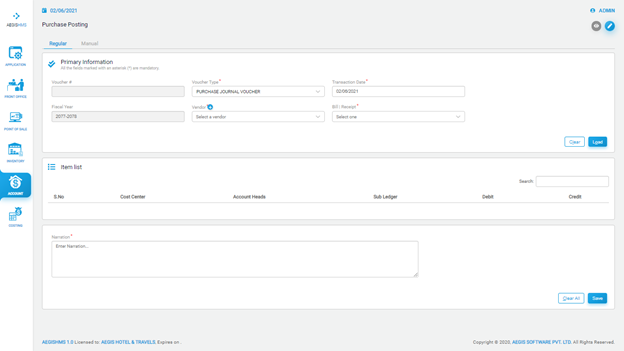
To view the purchase posting from a ‘Regular’ tab, you need to select a voucher type from the ‘Voucher Type’ field. Then, you need to keep the date of the transaction that you want to list down. Accordingly, the system will automatically update ‘Fiscal year’. You can also select a vendor or add a vendor from the (+) sign in a ‘Vendor’ field. Finally, you can select Bill or Receipt from the given field and load the transaction by clicking on ‘Load’ or press Alt + L. If not, you can clear the transaction by clicking on ‘Clear’ or press Alt + C.
If you click on load, then you will see the pop as given below with item names and grand total.
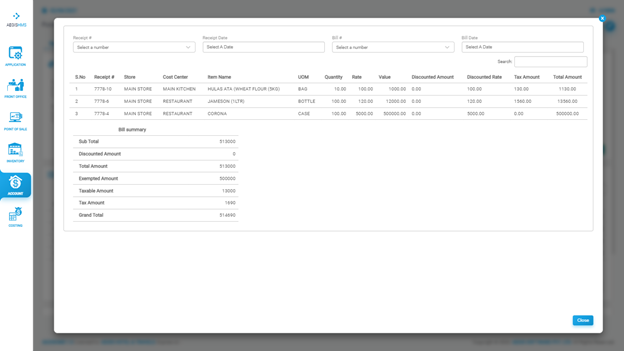
To close the pop-up, you can either click on ‘Close’ or press the Esc button on the keyboard.
The transaction you loaded will appear on the Item List. At last, you must write a narration for every posting and save it by pressing Ctrl+S. If you want to clear the transaction, you can click on the ‘Clear all’ button.
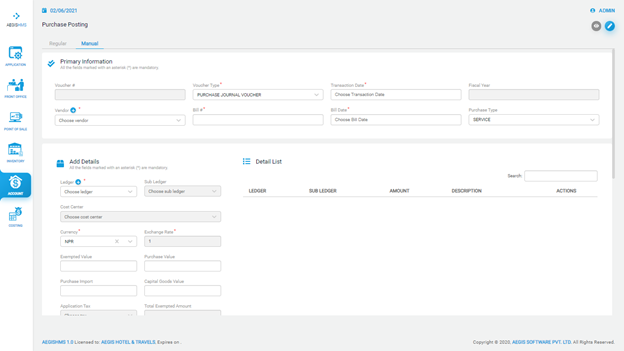
From the ‘Manual’ tab, you can view the list of purchase posting for items not listed in the Inventory. You can also directly post items with bill numbers and bill dates. You can select either Goods or Service from the ‘Purchase Type’ field and go to ‘Add details’.
In ‘Add Details’, you can select the ledger type or add the ledger from the (+) sign and, you can also add the sub-ledger if required. You can also select cost center from the ‘Cost Center’ field. You should also add currency, exempted value, purchase import, and capital goods value. Finally, you will see the grand total and add a description.
The entered purchase posting will appear on the Entry List. At last, you must write a narration of the transaction and save the transaction by pressing Ctrl+S.
No Comments