Aegis Software - HRM (Payroll) Module User Manual
🔧 1. Payroll Module Setup (Initial Setup)
1.1 Create Receivable Profile
-
Path:
Application >> Receivable Profile -
Enter staff receivable details here.
-
Ensure staff is created under proper staff classification.
-
✅ This setup is crucial for posting salary to accounting.
1.2 HRM Staff Profile Setup
-
Path:
HRM >> Staff Profile Setup -
Configure payroll and HR details.
-
Add staff's email address to enable auto-email of salary slips.
-
Include bank account details to generate a salary payment letter to the bank.
1.3 Payroll Head (Addition/Deduction Particular Heads) Setup
-
Path:
HRM >> Payroll Head -
Configure different salary components:
-
Title: Name of the head (e.g., Bonus, Basic Salary, Incentive)
-
Short Name: Abbreviation for the title
-
Apply Working Days: Select "Yes" if the head is affected by attendance (e.g., Basic Salary), else "No"
-
Order #: Determines the order of appearance on the payslip
-
Active: Mark active/inactive based on current use
-
Taxable:
-
Addition: Mark "Yes" if this head contributes to taxable income
-
Deduction: Mark "Yes" if it decreases taxable income (e.g., SSF, PF = Yes; Advance = No)
-
-
Taxable Head Comparison Table
| Payroll Head | Type | Taxable |
|---|---|---|
| Basic Salary | Addition | Yes |
| SSF Deduction | Deduction | Yes |
| Advance Salary Deduction | Deduction | No |
1.4 Payslip Structure Setup
-
Path:
HRM >> Payslip Structure -
Select staff ➝ Add required addition/deduction values ➝ Save
-
If applicable, choose Remote Area (A/B/C) to comply with government tax rules
✅ Setup is now complete. You are ready to create and post payslips.
🔁 2. Transaction – Posting Salaries
Path: HRM >> Payroll Posting
Steps:
-
Select Posting Status: Pending, Posted, or Draft
-
Select Posting Type: Salary or Wage
-
Optionally, filter by Department, Cost Center, or Staff Classification
-
Choose Staff (multi/single/all)
-
Select Fiscal Year and Salary Post Month
-
Transaction Date: Defaults to month's end, but can be customized
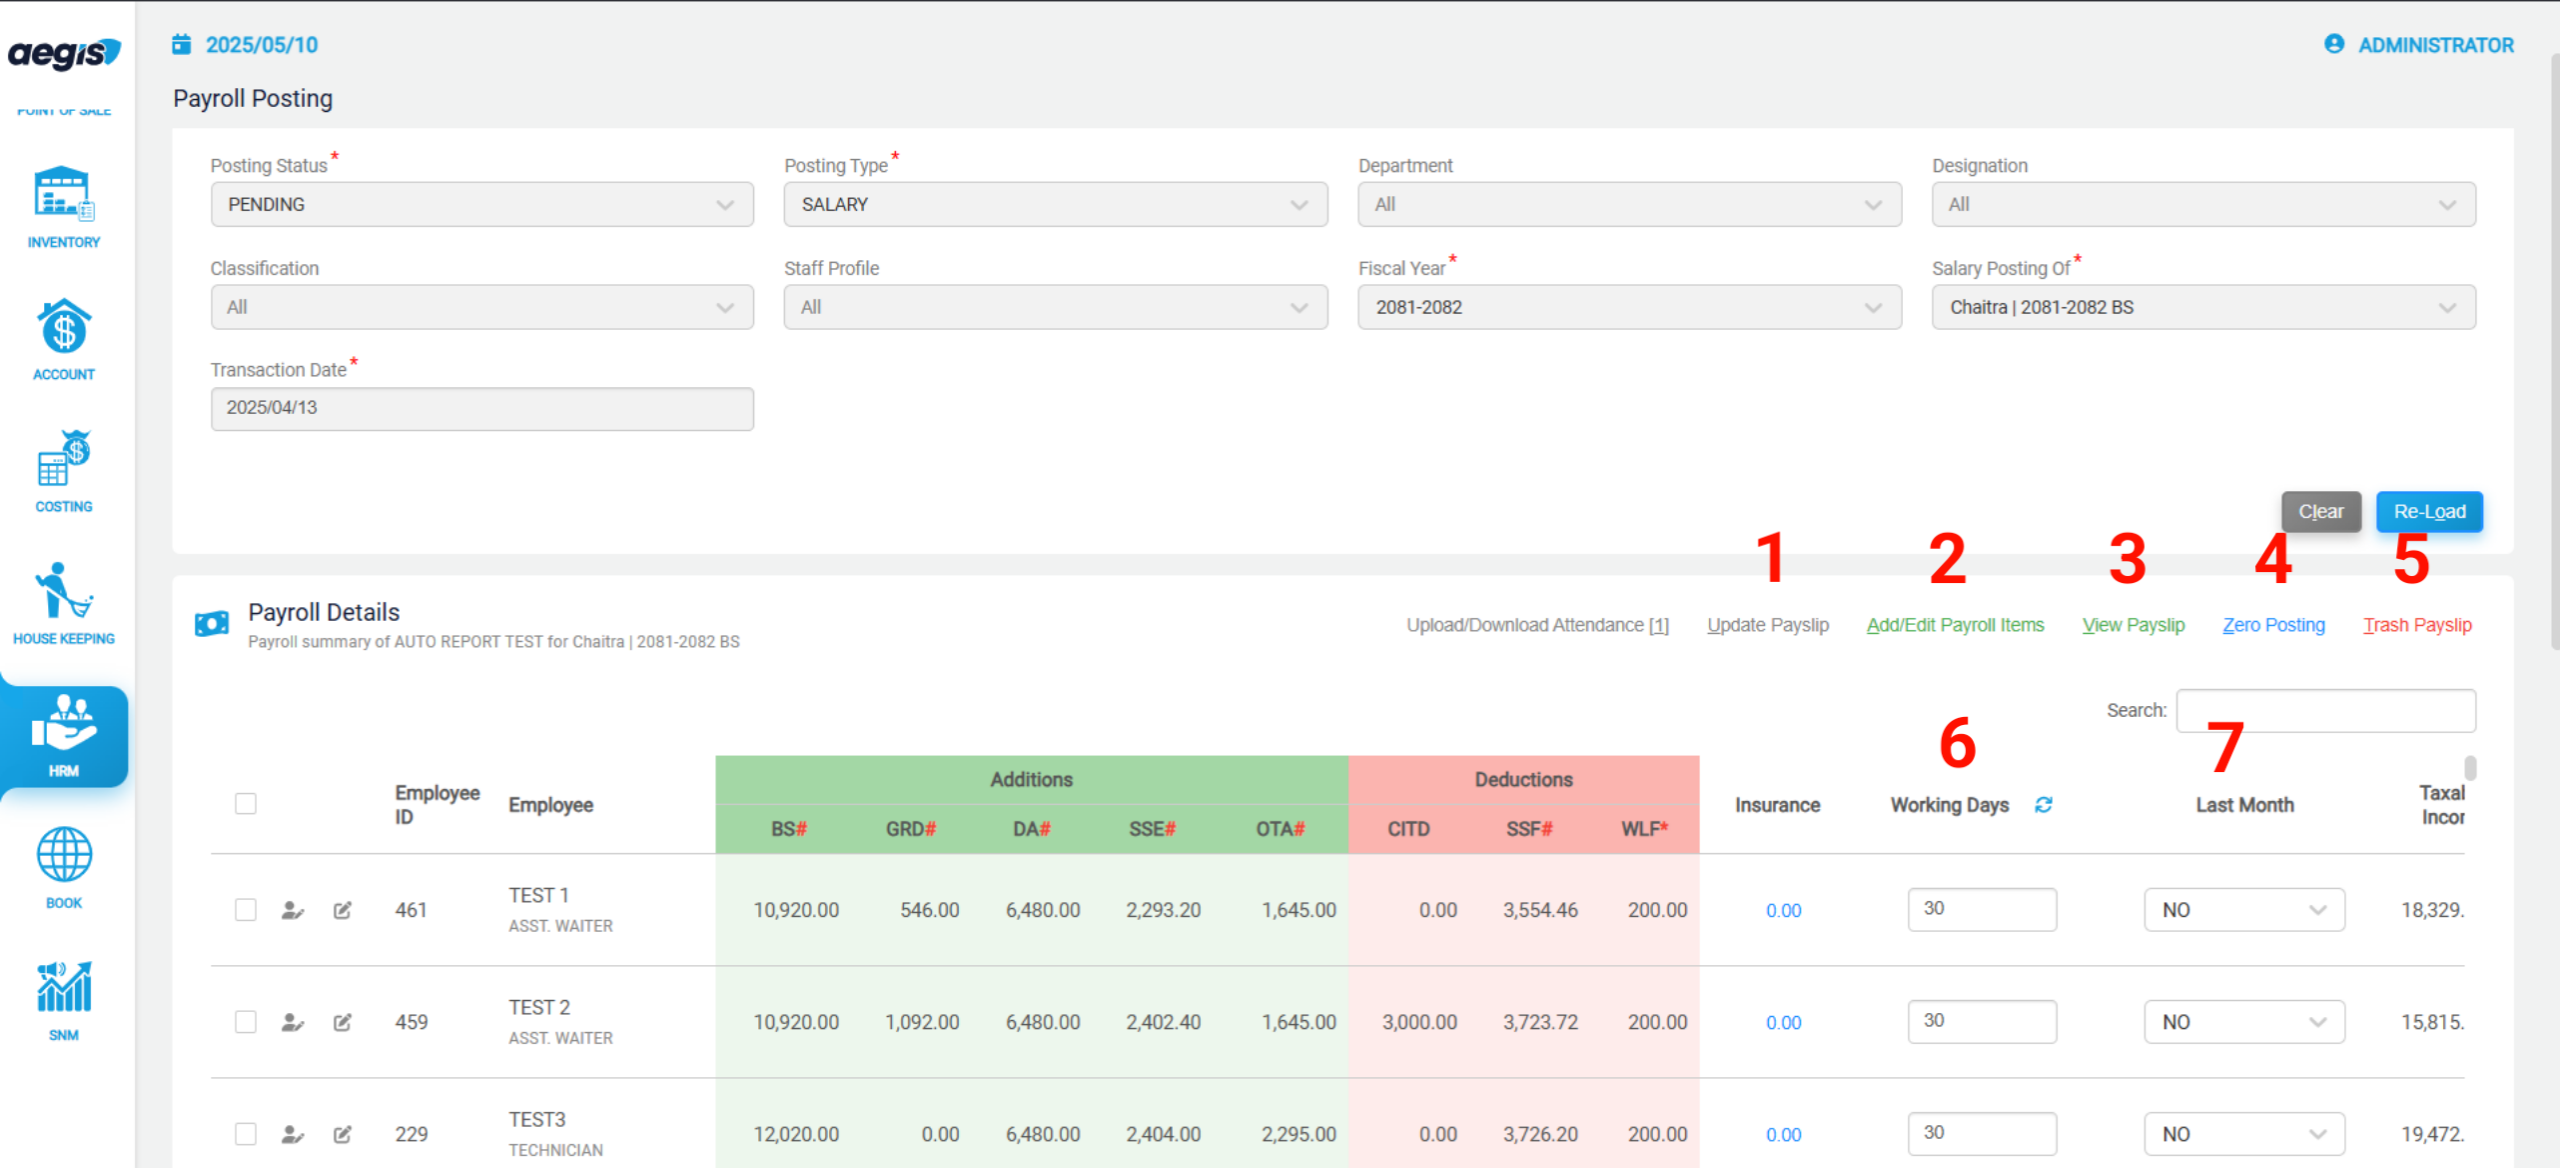
1 Update Payslip
-
Update payslip structure without navigating to Payslip Structure setup.
2 Add/Edit Payroll Items
-
Add special one-time additions or deductions (e.g., Advance Salary).
-
Select staff ➝ Click Add/Edit ➝ Choose Head ➝ Enter Value.
3 View Payslip
-
Preview payslip before posting.
4 Zero Posting
- if someone joined mid of fiscal year. that case we have to post not working month to prevent TDS calculation for no work month.
5 Trash Payslip
-
Deletes draft or posted payslip.
-
⚠️ You can only trash posted payslips if voucher is not generated.
-
Trashed payslips move to Draft.
6 Working Days
- Enter here staff's attendent days.
7 Last Month = Yes
-
When selected, system treats the salary as final post for the fiscal year.
-
If a staff leaves early, TDS adjustments are auto-handled.
➤ Save as Draft
-
Use when you want to prepare payroll but post it later.
-
To post saved drafts, select status = Draft ➝ Load ➝ Post.
➤ Payroll Details
-
See a detailed breakdown of current payroll post.
➤ Download
-
Download selected staff payslips in Excel.
➤ Summary
-
View total tax, salary, deductions for reporting.
📐 3. Automatic Tax Calculation Logic
Tax is auto-calculated based on:
| Setup Area | Fields Considered |
|---|---|
| Staff Profile | Gender, Marital Status, Disability |
| Payroll Head | Taxable (Yes/No) |
| Payslip Structure | Remote Area selection |
| Payroll Posting | Working days, custom adjustments |
| Other | SSF, PF contributions |
📊 4. Reports Comparison Table
| Report Name | Path | Description |
|---|---|---|
| Staff Payroll History Report | HRM >> Staff Payroll History | Displays all posted salary data. Useful for checking salary records of each staff. Includes two views: Detail View (great for Excel export and manual reporting) and Summary View (grouped by Department, Staff, Month, etc.). |
| Payslip Structure | HRM >> Payslip Structure | Shows the salary details configured for each staff before actual posting. Includes all heads such as SSF, PF, and insurance. Also useful to verify upcoming increments (filter by Type = Upcoming). |
| Bank Statement | HRM >> Bank Statement | Prepares printable bank letters for salary disbursement. Filter staff by Department, Cost Center, Designation, and Month. Output can be viewed or directly printed as an official letter. |
| Payroll Transaction Report | HRM >> Payroll Transaction Report | Displays posted payroll data filtered by selected payroll heads. Allows you to choose which heads to include in the report. Also includes summary totals and customizable column order. |
| Tax Report | HRM >> Tax Report | Displays TDS/tax information based on posted salary per staff. Useful for internal auditing or preparing tax statements. |
| Staff Profile Detail Report | HRM >> Staff Profile Detail Report | Shows detailed staff information including basic profile and payslip data. Filterable to include/exclude specific fields. Good for audits or master record verification. |
| Staff Attendance Report | HRM >> Staff Attendance Report | Like the profile detail report, but includes working day and attendance data. You can control which additions/deductions appear. Monthly attendance and posted salary can be reviewed here. |
| Payslip vs Posted Report | HRM >> Payslip vs Posted Report | Helps you compare the values set in Payslip Structure vs what was actually posted. Useful for catching mismatches or corrections required before final reports. |
🛠️ 5. Additional Tools
➤ Template Design
-
Path:
HRM >> Template Design -
Customize bank letter templates using keyboard tokens.
➤ Staff Classification Setup & Rights Control
-
Path:
-
HRM >> Staff Classification Setup -
HRM >> Staff Profile Setup -
HRM >> Userright
-
-
Classify staff for HR segmentation.
-
Use
Userrightto assign user-based access on transactions & reports.
🎉 Congratulations!
You now know how to:
-
Setup staff, payroll heads, and payslip structure
-
Post and manage payroll transactions
-
Handle tax configurations and end-of-employment TDS
-
Generate reports, letters, and export data
No Comments