
Restaurant Self-Ordering System - CMS & Admin Setup
Overview
This document highlights the features, fields, validation rules, business logic, and edge cases for the Setup Page and CMS Admin Panel, covering both desktop and mobile versions. It is based on the application's existing data models, allergen requirements, tax rules, and operational processes.
Guests scan a QR code on their table, browse the menu on their phone, add items and add-ons to a cart, and place the order. The kitchen receives the order by station. Guests install nothing. The Setup Page supports three admin levels across Desktop, Mobile, and Tablet devices for management, floor, and kitchen operations.
System Architecture & Role-Based Access Control
The Setup Page supports three admin levels across Desktop, Mobile, and Tablet devices for management, floor, and kitchen operations.
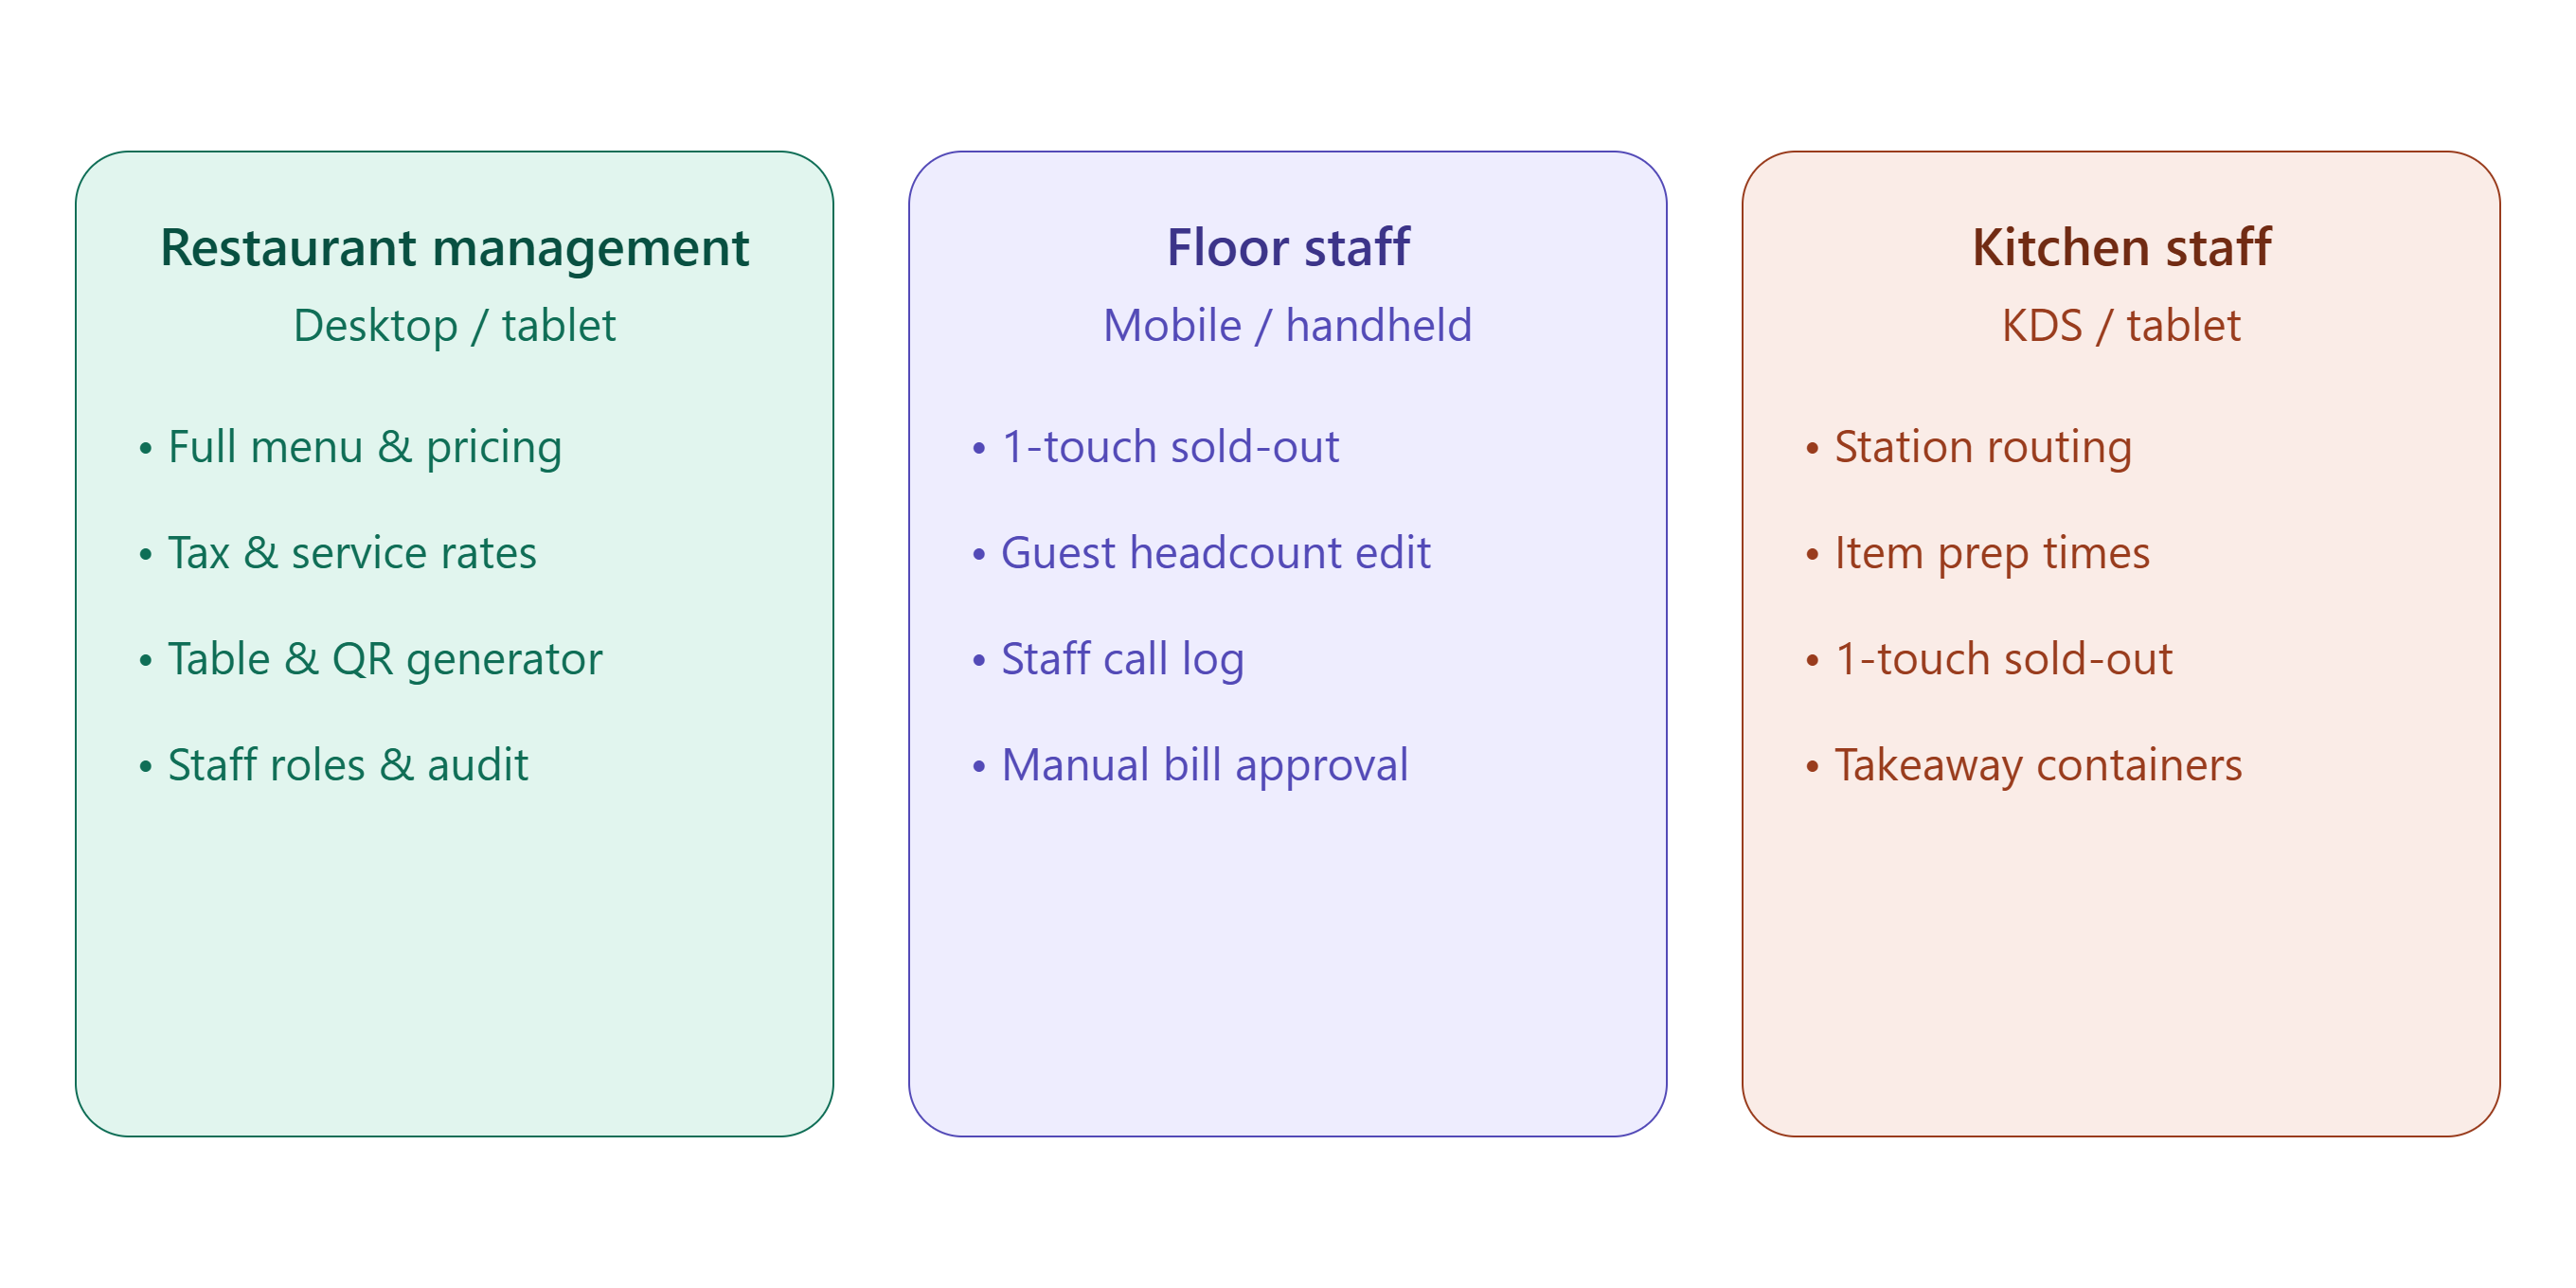
Access Permission Matrix
| Module / Action | Restaurant Management | Floor Staff | Kitchen Staff |
| Add / Edit / Delete Menu Items | Full Access | View Only | View Only |
| Change Base Prices & Tax Rates | Full Access | Denied | Denied |
| Toggle Real-time Item Availability (Sold Out) | Full Access | Full Access | Full Access |
| Table & QR Code Generation & Seating Setup | Full Access | View / Reassign | Denied |
| Staff Call Routing & Notification Config | Full Access | View Only | Denied |
| Kitchen Station Routing & Prep Time Windows | Full Access | Denied | Edit Prep Time |
| Order Cancellation / Void Override | Full Access | Manager PIN / Authorization Required | Denied |
1. Category Setup
This module is used to create and manage menu categories, menu items, dish details, nutrition information, and item options.
The Category Management section consists of the following pages:
1.1 Category List Page
The Category List Page displays all configured menu categories.
- View all categories in a list.
- View category details such as name-Ja, name-En, Image, Display Order, and Status.
- Edit existing categories.
- Create a new category.
1.2 Category Ordering Page
The Category Ordering Page is used to control the display sequence of categories in the customer-facing CategoryNav.
- Display all active categories.
- Drag and drop categories to change their order.
- Manually adjust the category order.
- Sort categories using available Sort options.
- The updated order is reflected in the customer-facing CategoryNav.
1.3 Category Configuration Form
The Category Configuration Form is used to create or edit category information.
| Field Name | Data Type | Required | Default | Validation & Input Constraints |
| id | String (Slug) | Yes | - |
2–30 chars; lowercase alphanumeric + hyphens (/^[a-z0-9-]+$/). Must be unique. |
| name-Ja | String | Yes | - | 1–30 chars Japanese text (Kanji/Kana). |
| name-En | String | Yes | - | 1–50 chars English text. |
| image | URL / File | No | Default placeholder |
Valid HTTPS image URL or uploaded JPEG/WebP (min 300×300px, max 2MB). |
| displayOrder | Integer | Yes | Next sequence |
Positive integer ≥ 1. Controls horizontal scroll sequence in CategoryNav. |
| isActive | Boolean | Yes | true | When isInactive, hides category and all child items from customer view. |
Business Rule: A category cannot be deactivated while it contains active published items.
2. Menu & Content Setup
This module is used to create, manage, customize, and display menu items for the ordering system.
2.2 Menu Item List
2.2.1 List Page Features
| Feature | Description |
|---|---|
| Search | Search menu items by item code, name, category, or menu group. |
| Category Filter | Filter items by configured category. |
| Outlet Filter | Filter items by outlet. |
| Menu Group Filter | Filter by menu group such as Starters, Main Course, or Beverages. |
| Kitchen Filter | Filter items by assigned kitchen/preparation station. |
| Availability Filter | Filter by Available or Sold Out. |
| Status Filter | Filter by Active/Inactive items if applicable. |
| Sort | Sort by Name, Item Code, Category, Price, Preparation Time, or Availability. |
| Edit | Open the selected menu item for editing. |
| Copy | Create a new menu item using an existing item's configuration as the starting point. |
2.2.2 Menu List
| Column | Description |
|---|---|
| Image | Menu item image |
| Item Code | Internal POS/SKU code |
| Name (English/ Japanese) | Menu item name |
| Category | Assigned category |
| Menu Group | Reporting/kitchen grouping |
| Price | Selling price |
| Kitchen | Preparation station |
| Prep Time | Preparation time in minutes |
| Availability | Available / Sold Out |
| Action | Edit / Copy |
2.2 Menu Item Setup
Creating or editing a menu item uses a step-based setup.
2.2.1 Step 1 — Basic Information
Basic information, pricing, availability, routing, and display information are configured here.
| Field Name | Data Type | Required | Default | Validation & Input Constraints |
| outlet | Enum (DLL) | Yes | - | Dropdown list of configured outlets. Determines which outlet this item belongs to. |
| id (auto) | String | Yes | - | Unique identifier. |
| categoryId | String | Yes | - | Must reference an existing active Category.id. |
| menuGroup | Enum (DLL) | Yes | - |
Groups items for reporting and kitchen routing (e.g., Starters, Beverages, Main Course). |
| costPercentage | Decimal (% | Yes | - |
Cost of goods as a percentage of the selling price. Range 0–100. Used for margin reporting. |
| discountAllowed | Boolean (Yes/No) | Yes | Yes |
- |
| ncAllowed | Boolean (Yes/No) | Yes | - |
"No Charge" allowed. If Yes, authorized staff can mark this |
| kitchen | Enum (Dropdown) | Yes | - |
Kitchen / preparation station this item routes to (e.g., Main Kitchen, Bar, Dessert Station). |
| itemCode | String | Yes | - |
Internal SKU / POS code for the item. Alphanumeric, must be unique. |
| name-Ja | String | Yes | - | 1–60 chars Japanese text. |
| name-En | String | Yes | - | 1–80 chars English text. |
| description-Ja | Text | Yes | - |
10–300 chars. |
| description-En | Text | Yes | - |
10–400 chars. |
| price | Integer (JPY) | Yes | - |
Integer ≥ 0 and ≤ 1,000,000. Japanese consumption tax compliance requires entering the tax-inclusive gross amount. Japanese yen does not utilize decimals or fractional coins for everyday purchases, a transaction of this amount would physically round to 110 Yen. |
| taxRateCategory | Enum | Yes | standard_10 |
Options: standard_10 (Dine-in standard) reduced_8 (Takeaway food/drink) |
| image | URL / File | Yes | - |
Valid HTTPS URL or WebP/JPG upload. 16:9 or 4:3 ratio recommended. Min 800×600px. |
| badges | Array<Enum> | No | - | Multi-select: seasonal, set , spicy. |
| spiceLevel | Integer | Conditional | 0 |
Required if spicy badge selected: integer 1 (Mild) to 3 (Extra Hot). |
| prepTimeMinutes | Integer | Yes | 8 |
Positive integer 1 to 120. Displayed on food cards. |
| calorie | Integer | No | null |
Integer 0 to 5000 (kcal). |
| origin-Ja | String | No | null | Max 60 chars. |
| origin-En | String | No | null | Max 80 chars. |
| isSchedulable | Boolean | Yes | false | If true, item can be pre-ordered for specific dining time slots in CartModal. |
| isAvailable | Boolean | Yes | true |
Real-time availability flag. When false, displays "Sold Out" overlay and disables "+" button. |
2.2.2 Step 2 — Portion Specs, Nutrition & Options (Add-Ons)
Step 2 contains the additional menu item information displayed on the food detail page and allows staff to configure customer customization options and add-ons.
A. Portion Specs & Ingredients
| Field Name | Sub-Field | Data Type | Required | Validation Rule |
|---|---|---|---|---|
| specs.weightSize | — | String | No | Max 30 chars. Examples: 600g, 250ml, 5 skewers, 2 pieces. |
| specs.ingredients-Ja | — | Text | Yes | Comma-separated Japanese ingredients. Max 500 chars. |
| specs.ingredients-En | — | Text | Yes | Comma-separated English ingredients. Max 600 chars. |
| Field Name | Sub-Field | Data Type | Required | Validation Rule |
|---|---|---|---|---|
| specs.nutrition | energy | String | No | Format: ^\d+(\.\d+)?\s*kcal$z |
| specs.nutrition | protein | String | No | Format: ^\d+(\.\d+)?\s*g$ |
| specs.nutrition | fat | String | No | Format: ^\d+(\.\d+)?\s*g$ |
| specs.nutrition | salt | String | No | Format: ^\d+(\.\d+)?\s*g$ |
Warning: Nutrition data older than 12 months should be flagged for review.
B. Customization Options (Add-Ons)
Examples:
- Rice Portion
- Cooking Style
- Sauce
- Add-ons
|
|
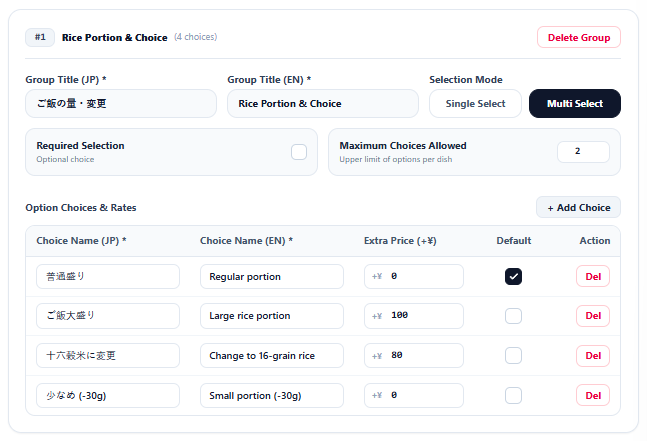
Option Group Configuration
| Field Name | Data Type | Required | Validation Rule |
|---|---|---|---|
| id | String | Yes | Unique identifier. Example: opt-rice. |
| titleJa | String | Yes | Japanese option group name. |
| titleEn | String | Yes | English option group name. |
| descriptionJa | Text | No | 10–400 chars. |
| descriptionEn | Text | No | 10–250 chars. |
| selectionType | Enum | Yes | single_select (Radio) or multi_select (Checkbox). |
| required | Boolean | Yes | If Yes, customer must make the required selection before adding to cart. |
| minSelect | Integer | Yes | Minimum number of selections. 0 if optional 1 if required single-select. |
| maxSelect | Integer | Yes | 1 for single-select ≥1 or null for multi-select/unlimited. |
Option Choices & Rates
| Field Name | Data Type | Required | Validation Rule |
|---|---|---|---|
| id | String | Yes | Unique identifier. Example: rice-large. |
| choicenameJp | String | Yes | Japanese option name. |
| choicenameEn | String | Yes | English option name. |
| extraPrice | Integer (JPY) | Yes |
Amount added to or subtracted from the base price. Examples: +100, 0, -50. |
| isDefault | Boolean | Yes | Automatically selected when the Food Detail page opens. |
Default Selection Rule:
For a single_select group marked as Required, exactly one Option Item must be configured as the default.
Example
Rice Portion — Single Select — Required
| Option | Price | Default |
|---|---|---|
| Regular | ¥0 | ✓ |
| Large (+100g) | +¥100 | |
| Small (-50g) | -¥50 |
Add-ons — Multi Select — Optional
| Option | Price |
|---|---|
| Extra Egg | +¥100 |
| Extra Sauce | +¥50 |
| Green Onion | +¥30 |
Portion Specs & Ingredients → Nutrition Information → Customization Options (Add-Ons).
2.2.3 Step 3 — Allergens & Dietary Tags
Step 3 — Allergens & Dietary Tags
│
├── A. Allergen Information
│   ├── Allergen
│   └── Status
│       ├── Contains
│       ├── Free
│       └── Shared Equipment
│
├── B. Dietary Tags
│   ├── Vegetarian
│   ├── Vegan
│   ├── Gluten Free
│   └── Halal
Step 3 allows staff to configure allergen information and dietary tags for each menu item.
A. Allergen Information
Staff can define the allergen status of each applicable allergen for the menu item. Each allergen can have one of three statuses:
| Status | Description |
|---|---|
| Contains | The allergen is intentionally present in the menu item. |
| Free | The allergen is not present in the menu item. |
| Shared Equipment | The allergen is not intentionally included, but the menu item may have been prepared using equipment that also handles the allergen. |
Mandatory Allergens
Based on Japan's Food Labeling Act and Consumer Affairs Agency guidelines, the CMS must support the following 8 mandatory allergens:
- Wheat
- Egg
- Milk
- Shrimp
- Crab
- Buckwheat
- Peanut
- Walnut
Peanut — Shared Equipment
The dish does not contain peanuts, but it is prepared using equipment that also processes peanuts.
Allergen Configuration
| Field Name | Data Type | Required | Validation & Input Constraints |
|---|---|---|---|
| id (auto) | String | Yes | Auto-generated. 2–30 characters; lowercase letters, numbers, and hyphens only. Must be unique. |
| name-Ja | String | Yes | 1–30 Japanese characters. |
| name-En | String | Yes | 1–30 English characters. |
| description-Ja | Text | Yes | 10–250 characters. |
| description-En | Text | Yes | 10–400 characters. |
| image | SVG Upload | Yes | - |
| isActive | Boolean (Yes/No) | Yes | Default: Yes. Determines whether the allergen is available for selection and display. |
| Tag | Validation Rule |
|---|---|
| Vegetarian | The menu item must comply with the defined vegetarian requirements. |
| Vegan | The menu item must satisfy Vegetarian requirements. Egg and Milk must be Free. |
| Gluten Free | Wheat and Buckwheat must be Free. |
| Halal | The menu item must not contain pork or alcohol. |
Dietary Tag Configuration
| Field Name | Data Type | Required | Validation & Input Constraints |
|---|---|---|---|
| id (auto) | String | Yes | Auto-generated. 2–30 characters; lowercase letters, numbers, and hyphens only. Must be unique. |
| name-Ja | String | Yes | 1–30 Japanese characters. |
| name-En | String | Yes | 1–30 English characters. |
| description-Ja | Text | Yes | 10–250 characters. |
| description-En | Text | Yes | 10–400 characters. |
| image | SVG Upload | Yes | Only .svg files are allowed. |
| isActive | Boolean (Yes/No) | Yes |
Default: Yes. Determines whether the dietary tag is available for selection and display. |
3. Combo Menu Setup
The Combo is an Ordering App concept only. It exists purely to help the guest select several related items together at a bundled price.
3.1 Combo List Page
The Combo List Page displays all combos configured for the outlet.
| Field | Description |
|---|---|
| Combo ID | Unique identifier of the combo |
| Combo Name-Ja | Combo name in Japanese |
| Combo Name-En | Combo name in English |
| Combo Description-Ja | Combo description in Japanese |
| Combo Description-En | Combo description in English |
| Availability | Effective date/time and applicable days |
| Status | Active / Inactive |
| Actions | View/Edit |
3.2 CMS Setup - Combo
| Field Name |
Data Type |
Required |
Validation & Input Constraints |
|---|---|---|---|
| id | String (slug) |
Yes |
Unique per outlet |
| Combo name-Ja | String |
Yes |
1–30 chars Japanese text. |
| Combo name-En | String |
Yes |
1–30 chars English text. |
| effectiveFrom | Date |
No |
Date from which the combo is available |
| effectiveTo | Date |
No |
Date until which the combo is available |
| startTime | Time |
No |
Daily start time |
| endTime | Time |
No |
Daily end time |
| applicableDays | Array ( checkbox ) |
Yes |
Already defined 22 Sep 2026 — combo availability window. |
| isActive | Boolean |
Yes |
Whether the combo is available for sale |
3.3 Combo Sub-Groups & Selectable Items
|
|
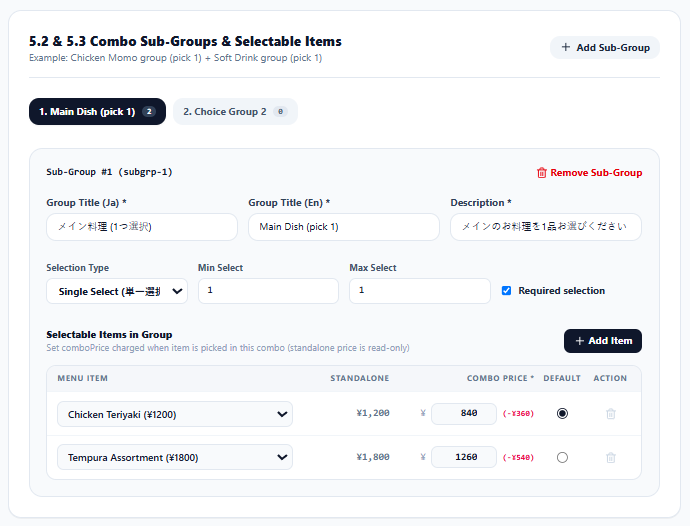
3.3.1 Combo Sub-Groups
| Field Name | Data Type | Required | Description |
|---|---|---|---|
| id | String / Auto | Yes | Unique sub-group ID |
| title-Ja | String | Yes | Group name in Japanese |
| title-En | String | Yes | Group name in English |
| decription | Text | Yes | - |
| selectionType | Enum | Yes | Single Select / Multi Select |
| minSelect | Integer | Yes | Minimum number of items guest must select |
| maxSelect | Integer | Yes | Maximum number of items guest can select |
| required | Boolean | Yes | Whether selection is mandatory |
3.3.2 Selectable Items
Each Sub-Group contains the menu items that the guest can select.
| Field Name | Data Type | Required | Description |
|---|---|---|---|
| itemId | Reference | Yes | Existing Menu Item selected from Menu Setup |
| itemName | Reference / Read-only | - | Automatically displayed from Menu Setup |
| standalonePrice | Integer (JPY) / Read-only | - | Automatically displayed from Menu Setup |
| comboPrice | Integer (JPY) | Yes | Price charged when the item is selected in this combo |
| isDefault | Boolean | No | Sets the item as the default selection |
The Combo Setup page allows staff to manage the configured Sub-Groups and their selectable items.
Sub-Group Actions For each Sub-Group, staff can:
- Add Sub-Group
- Edit Sub-Group
- Delete Sub-Group
- Reorder Sub-Groups, if ordering is supported
Deleting a Sub-Group also removes the selectable-item configuration belonging to that Sub-Group.
Selectable Item Actions For each Sub-Group, staff can:
- Add Item
- Edit Item
- Delete Item
- Set as Default
Only the selected item configuration is removed when an item is deleted. The original Menu Setup item is not deleted.
3.4 Combo Strcuture
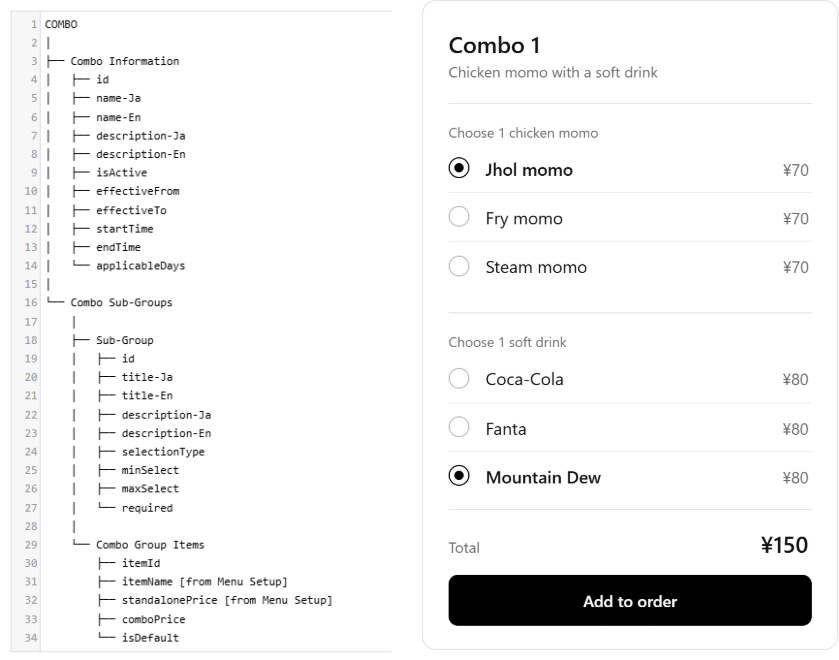 |
So the important relationship is:
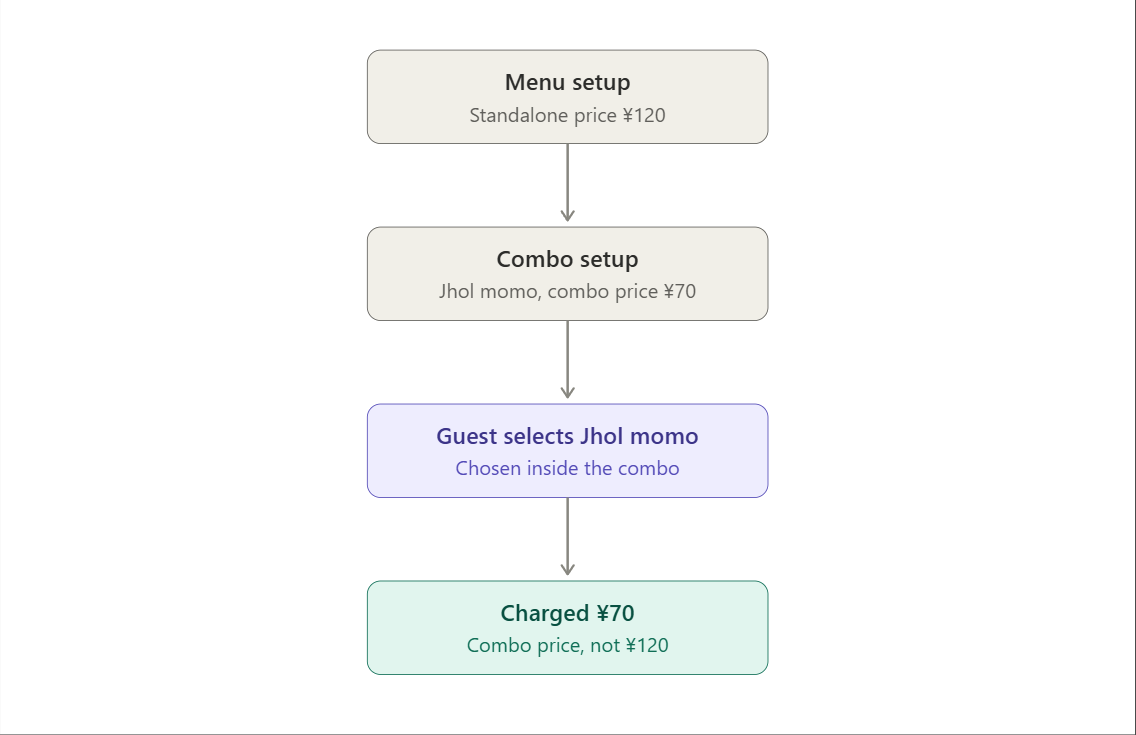
The ¥120 remains the normal standalone price. The combo configuration only tells the system that when Jhol Momo is selected inside Combo 1, its price is ¥70.
|
|
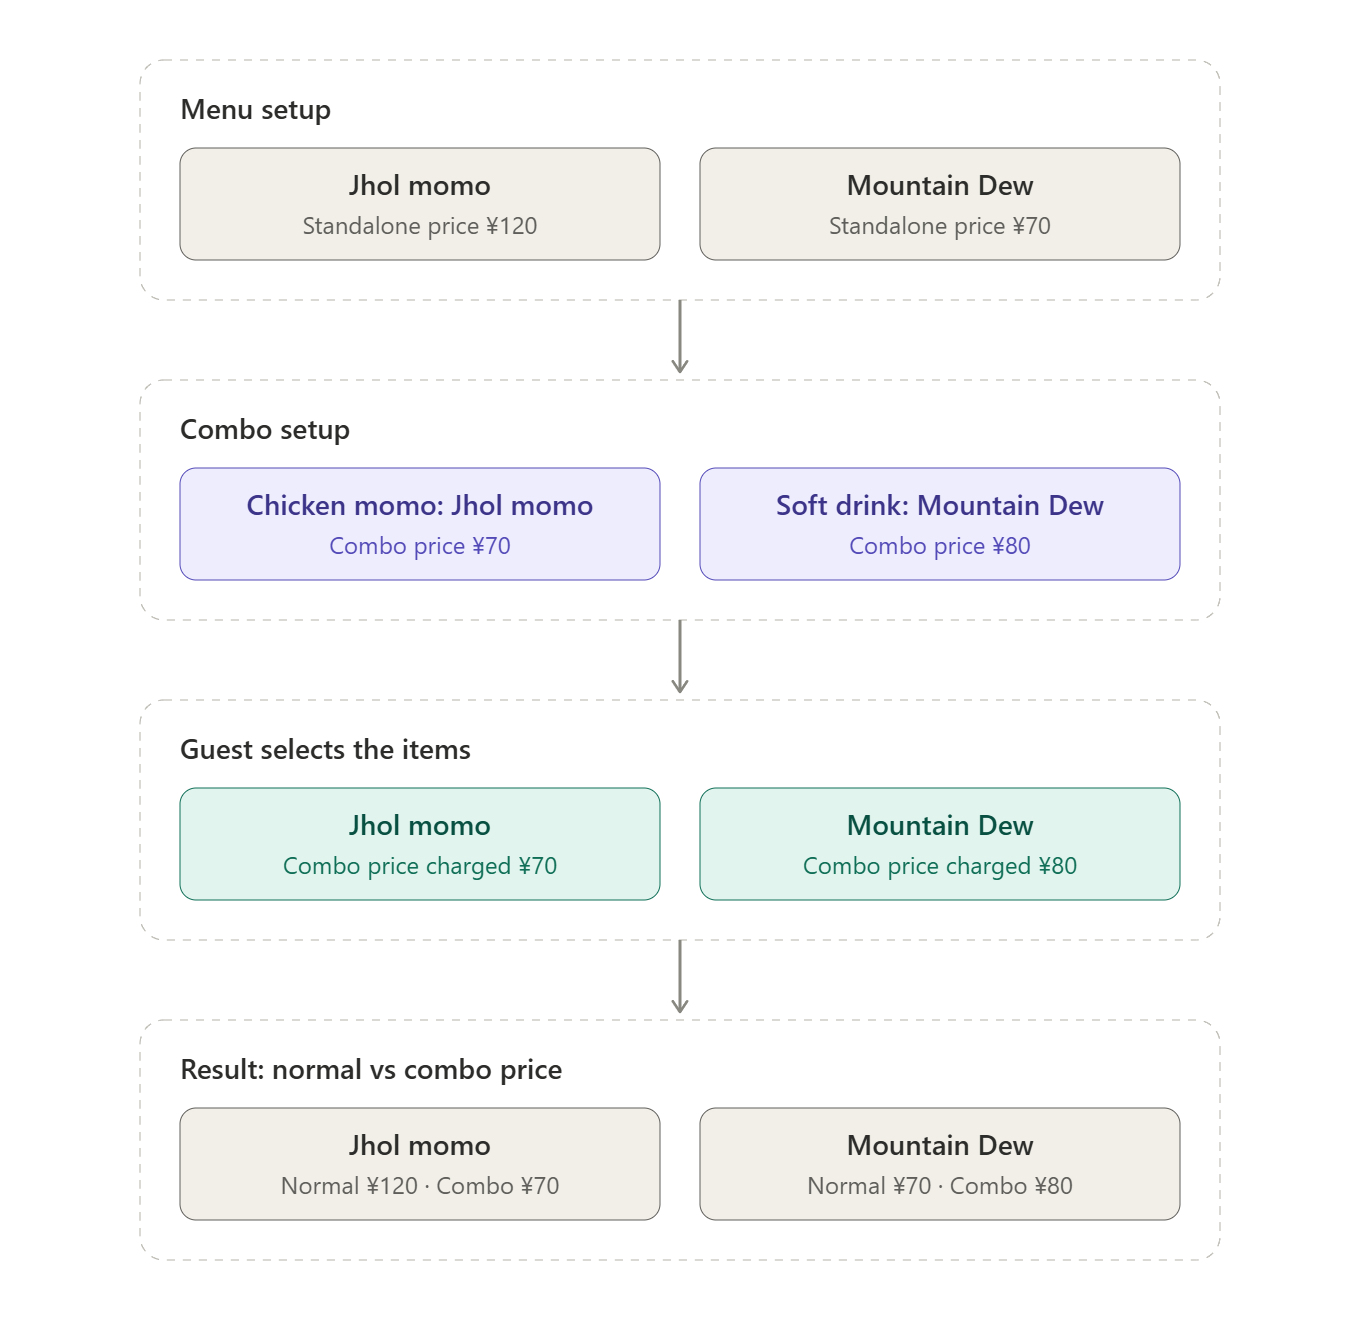
Ordering app behaviour (guest-facing):
- The guest opens a combo (e.g. Combo 1) and sees its groups, such as "Chicken momo" and "Soft drink".
- Each group asks the guest to choose 1 item. The options are Jhol, Fry, or Steam momo, and Coca-Cola, Fanta, or Mountain Dew.
- Each option shows its combo price (¥70 for momo, ¥80 for drinks), not its standalone price.
- The guest can't continue until every required group has a selection.
- The running total updates as the guest picks (for example ¥70 + ¥80 = ¥150).
- Tapping "Add to order" adds the combo to the cart as one grouped line.
- The cart shows the chosen items under the combo, with the combo price charged for each.
- If the same item is ordered outside the combo, it's charged its standalone price (Jhol Momo ¥120, Mountain Dew ¥70).
- The guest can edit or remove the combo from the cart before placing the order.
- On placing the order, the guest sees the final total and a confirmation.
Example used throughout this section:
Combo 1 is built from two selectable groups. The guest picks one item from each group:
| Combo Sub-Group |
Selectable Items (standalone price) |
Combo Price (when chosen inside Combo 1) |
|---|---|---|
| Chicken Momo (pick 1) |
|
|
| Soft Drink (pick 1) |
|
|
Result: guest pays ¥150 for Combo 1 (¥70 + ¥80), instead of the standalone total the two items would otherwise cost.
4. Table & QR Security
The Table & Seating Setup is used to configure restaurant table information, seating capacity, floor location, and the security settings required for customers to access the table ordering session.
4.1 Table & Seating Geometry
This section defines the basic information and physical seating configuration of each restaurant table.
| Field Name | Data Type | Required | Validation & Input Constraints | Description |
|---|---|---|---|---|
| Table Identifier | String | Yes | Must be unique within the restaurant. | Unique identifier used to identify the table. |
| Floor Zone | String / Dropdown | Yes | Must be selected from the configured floor zones. | Defines the floor or seating area where the table is located. |
| Seating Capacity | Integer | Yes | Must be a positive whole number. | Defines the maximum number of seats available at the table. |
| Restaurant Name | String | Yes | Must be a valid configured restaurant name. | Identifies the restaurant associated with the table. |
| Store Wi-Fi SSID | String | No | Maximum length based on system configuration. | Stores the restaurant's Wi-Fi network name associated with the table location. |
4.1 Table QR Code & PIN Security
This section is used to generate and manage the QR code and security PIN that customers use to access the table ordering session.
| Field Name | Data Type | Required | Validation & Input Constraints | Description |
|---|---|---|---|---|
| Table Session Security PIN | 4-Digit PIN | Yes | Must contain exactly 4 numeric digits. | Requires the guest to enter the configured PIN before accessing the table session. This helps prevent unauthorized off-site ordering. |
| QR Code | SVG / Image | Auto-generated | Generated from the Customer POS Direct URL. | QR code that customers scan to access the table ordering session. |
| Print Tabletop QR Stand | Action | - | - | Generates a printable tabletop QR stand containing the table QR code and required table information. |
Format Engine
Generates high-density vector SVG, PNG and other format files. Batch PDF Print Layout: Includes restaurant logo, assigned Table Number in bold typography, QR code, and a bilingual call-to-action (JP / EN: "Scan QR with your camera to view menu & order").
Session Security & Tamper Prevention:
| Scenario | System Behavior |
|---|---|
| First customer scans the QR | The first customer who scans the table QR is shown a unique 4–5 digit session code. |
| Another customer at the same table scans the QR | They can access the table menu, but they will not see the session code. They must obtain the code from the customer who started the session. |
| Someone scans a QR from outside the restaurant | If they have a photo or copy of the static QR, they can open the menu but cannot place an order without the active session code. |
| Customer wants to browse only | The customer can select “View Menu” / “Continue without Code” to browse the menu. This provides view-only access and does not allow ordering. |
| Session code changes | A new 4–5 digit code is generated for each table session. |
| Session ends | Restaurant staff ends/resets the session after payment or when the customer leaves. The previous code becomes invalid. |
| New customer uses the table | A new session is created with a new code, preventing the previous session from being reused. |
4.1.2 Guest Count & Session Headcount Rules
Where the guest sees it
When a customer scans the table QR code and enters the session, the Guest Count is visible this is also shown on the More page. The customer can set the number of guests who will participate in the session.
How the count is set
-
The customer can enter the Guest Count when joining the table session, for example, 4 guests.
-
The Guest Count is for staff information only and does not act as a session limitation. Additional guests can join the table session at any time, even if the Guest Count is already set to 4.
4. Tax, Pricing & Financial
4.1 Tax & Finance
The Taxes & Finance section is used to configure consumption tax rates, service charges, and the Qualified Invoice Registration Number required for checkout and receipt processing in Japan.
4.1.1 Taxes & Finance Fields
| Field Name | Data Type | Required | Validation & Input Constraints | Description |
|---|---|---|---|---|
| Standard Tax Rate (Dine-in) | Decimal / Percentage | Yes | Percentage value. Default: 10% | Defines the standard consumption tax rate applied to dine-in orders. |
| Reduced Tax Rate (Takeaway Food) | Decimal / Percentage | Yes | Percentage value. Default: 8% | Defines the reduced consumption tax rate applied to eligible takeaway food orders. |
| Service Charge Rate | Decimal / Percentage | No | 0% or greater. 0% disables the service charge. |
Defines the service charge percentage applied to eligible orders.
|
| Qualified Invoice Registration Number (Japan) | String | No | Must follow the configured Japanese Qualified Invoice Registration Number format. |
Stores the registration number displayed on checkout receipts and checkout totals. When configured, the registration number is displayed on:
|
4.1.2 Default Tax Configuration
| Tax Type | Default Rate | Applied To |
|---|---|---|
| Standard Tax Rate | 10% | Dine-in |
| Reduced Tax Rate | 8% | Eligible takeaway food |
| Service Charge | 0% | Disabled by default |
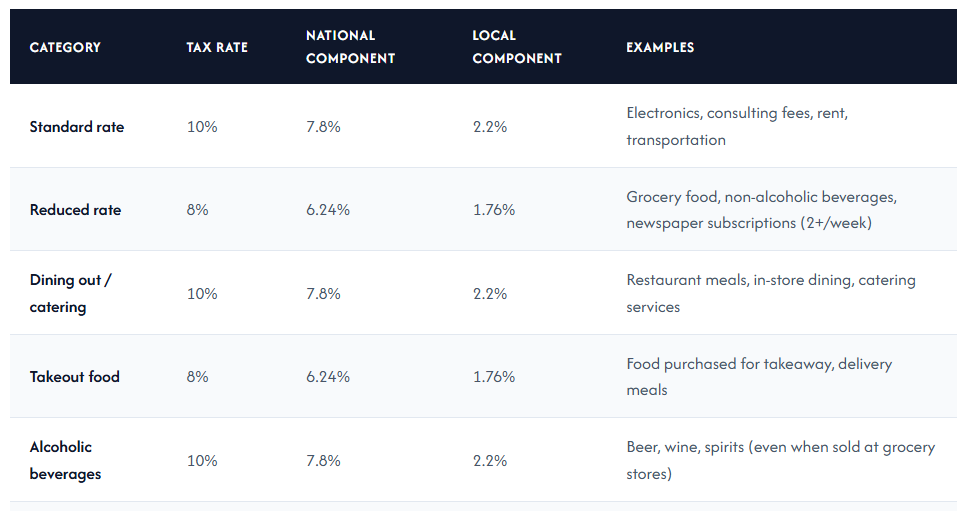
Legal Compliance (Total Price Display Law)
Reference: All Posts Japan Qualified Invoice System (Invoice Seido): What Foreign Companies Must Know
4.2 Accepted Payment Gateways
The Accepted Payment Gateways section is used to configure the payment methods available to guests during checkout. Each payment method can be enabled or disabled based on the restaurant's supported payment options.
Payment Gateway Configuration (Default)
| Payment Method | Default Status |
|---|---|
| Credit Card | Enabled / Disable |
| PayPay QR Code Settlement | Enabled / Disable |
| LINE Pay Mobile Payment | Enabled / Disable |
| Register Settlement (Cash / Counter) | Enabled / Disable |
At least one payment method should remain enabled so that guests have an available checkout option.
5. Operations & Grace Period (min)
The Operations & Grace Period section is used to configure floor staff call reasons displayed to guests and define the time period during which guests can cancel their own orders.
5.1 Floor Staff Call Reasons
Floor staff call reasons are displayed on the guest device to allow customers to request common services without directly contacting restaurant staff
| Call Reason | Display Name | Description |
|---|---|---|
| #1 | Water / Hot Tea Refill (Free) | Guest can request cold water or hot green tea. |
| #2 | Table Bill & Checkout Receipt | Guest can request an itemized bill to be brought to the table. |
| #3 | Extra Plates, Wipes & Utensils | Guest can request additional sharing plates, wet wipes, chopsticks, or other basic utensils. |
| #4 | Questions, Special Help & Service | Guest can request assistance with their order, including allergen inquiries or other service-related questions. |
5.2 Self-Cancellation Grace Period
The Self-Cancellation Grace Period defines how long a guest can cancel an order themselves after placing it.
| Field Name | Data Type | Required | Validation & Input Constraints | Description |
|---|---|---|---|---|
| Self-Cancellation Grace Period (Minutes) | Integer / Minutes | Yes | Must be a positive whole number. | Defines the number of minutes during which guests can self-cancel an order after placing it. Once the grace period expires, the Cancel Order control is disabled and hidden from the customer's order view, and the customer can no longer cancel the order directly. |
Order Cancellation Logic (cancellationTimeWindows)
cancellationTimeWindows defines the number of minutes after an order is placed during which the customer can cancel it directly (e.g., 5 = the customer can cancel within 5 minutes of ordering).
| Stage | System Behviour |
|---|---|
| Stage System Behavior Within the cancellation window | The customer sees a "Cancel Order" control in their order/cart view and can cancel the order directly, with no staff approval required. |
| Window exceeded | The self-cancel control is disabled and hidden from the customer's order view if the time has already been exceed. The customer can no longer cancel the order directly. |
| Customer still wants to cancel after the window |
The customer is shown a "Request Cancellation" button instead. Tapping it sends a cancellation request to Floor Staff / Restaurant Management rather than cancelling the order automatically. |
| Staff review | The request is actioned under the existing "Order Cancellation / Void Override" permission. |